Welcome to the RSF family! We’ve included some resources here to help you get started so you can begin shipping your orders quickly. Of course, never hesitate to reach out to your RSF account manager through TeamSupport or by emailing us at support@redstagfulfillment.com or give us a call if you need additional assistance.
Frequently Asked Questions
What is the RSF Operations Portal (Warehouse Management System)?
What is an ASN?
What is an RMA?
What is TeamSupport?
What are SOP’s?
What are RSF Shipping Addresses?
How Do I Submit a Kitting Order?
Can I use RSF for Amazon Replenishment?
Can I use RSF for LTL/TL Orders?
What information do I need to get an LTL quote?
What if I have special instructions associated with an order?
How do I file a claim for a lost or damaged package?
How do I estimate the shipping cost for an order?
Billing FAQ’s
Using the Red Stag Fulfillment Warehouse Management System
I. OPERATIONS PORTAL LOGIN INFORMATION
II. ADDING PRODUCTS & CREATING ASNs IN THE OPERATIONS PORTAL
III. BULK UPLOAD FOR ASNs, ORDERS, AND PRODUCTS
IV. CREATING ORDERS IN THE OPERATIONS PORTAL
V. ADDING RMAs INTO THE OPERATIONS PORTAL
VI. INTEGRATING WITH RED STAG FULFILLMENT’S WAREHOUSE MANAGEMENT SYSTEM
VII. KITS/BUNDLES IN THE RSF OPERATIONS PORTAL
What is the RSF Operations Portal?
Operations Portal: The RSF Operations portal is our proprietary Warehouse Management System. During the onboarding process, you will receive a link to the admin portal along with a username and password. The operations portal is where you will do things like:
- Create your products/SKUs
- Create ASN (Advanced Shipping Notice)
- Place manual orders
- Modify, cancel or hold existing orders
- Create RMA’s (Return Merchandise Authorization)
What is an ASN?
ASN stands for Advance Shipping Notice. ASN’s are created in the RSF Operations Portal and are used to notify the RSF inbound teams of upcoming shipments. ASN’s include the expected date of delivery, the name of the carrier and the products and quantities included in the shipment. Instructions for creating an ASN can be found below.
What is an RMA?
RMA stands for Return Merchandise Authorization. RMA’s are created in the RSF Operations Portal and are used to notify the RSF inbound teams of returns that will be coming back to one of our locations. RMA’s will include the customer name, authorization date, original order number, and carrier number. Instructions for creating an RMA can be found below.
What is TeamSupport?
TeamSupport: TeamSupport is the customer support software platform RSF uses to manage all issues related to customer support and customer service. During the onboarding process, you will receive a password reset notification to access the TeamSupport hub where you can submit, edit and review tickets. We request that all of our clients use TeamSupport for all customer service issues and requests so we can quickly and efficiently route all requests to the right person and get those issues resolved in the shortest amount of time. These instances include:
- Call tag/Re-route Requests
- Kitting Order Requests
- General Support
- Shipping Claims
- Order hold/modify/cancel requests
- Inventory/Product Inquiries
- Delivery/Returns Inquiries
What are SOP’s?
SOP stands for Standard Operating Procedure. The RSF team will work with you to define SOPs that are customized for your products. These procedures can range from how we receive and ship products to how we put together a kitting order and how we handle returns (ie: checking for damage before it is put back into inventory).
What are RSF’s Shipping Addresses?
Red Stag Fulfillment currently has two locations. The addresses can be found below. NOTE: Our addresses on Google are office addresses and inventory should not be sent to those addresses.
Knoxville, Tennessee
Red Stag Fulfillment
Attn: Your Company Name
5502 Island River Dr.
Knoxville, TN 37914
Phone: 865-281-1464 x1400
Salt Lake City, Utah
Red Stag Fulfillment
Attn: Your Company Name
5350 W Harold Gatty Dr, Suite A
Salt Lake, UT 84116
Phone: 800-815-7824 x1400
How Do I Submit a Kitting Order?
The RSF team is happy to provide kitting as an additional value added service to our clients. Keep in mind, while we seek to provide you with the highest level of service, we do reserve the right to deny any kitting service requests.
To place a Kitting Order you will log in to TeamSupport (or send an email to support@redstagfulfillment.com) and create a new ticket with the kitting request. The request should include thorough instructions for kitting including each SKU/Component that is included in a single kit as well as the total number of finished units you are requesting. Once that ticket is submitted, a representative from the RSF team will confirm we’ve received the ticket and will create a manual kitting order in the RSF Operations Portal.
Once the manual order has been created, the RSF team will send a screenshot of the final order as a response to the original TeamSupport ticket. You will need to review the order and confirm that all quantities and components are correct. Once you’ve done this, respond to the TeamSupport ticket with confirmation (or with any necessary edits to the order) and the RSF team will add your Kitting Order to the queue. NOTE: We will not add your kitting order to the queue until we’ve received confirmation on the order.
Currently, kitting orders are completed in the order they are received. An RSF representative will update you on a regular basis to let you know the status of the order, including when the kitting for the order has begun as well as when the order has been finished and is ready to be committed to inventory.
Can I use RSF for Amazon Replenishment?
Absolutely! If you have inventory at RSF that you would like to send to Amazon for FBA, we can support that. Here’s how that works:
- Create order in the RSF Operations Portal for everything you’d like to send and choose the shipping method you prefer. The shipping method for pallets will be LTL arranged by you or arranged by RSF. The shipping method for packages less than a pallet will most likely be Client Provided Label.
- Place the order on hold.
- Submit an “Amazon Replenishment” ticket in Team Support with the order number to notify the RSF Operations team.
- The RSF team will prepare the order and respond to the ticket with the weight and dimensions of the shipment.
- You will use this information to prepare the Amazon labels and once they are prepared will upload the labels into the TeamSupport ticket.
- Depending upon the size of the shipment and your preference either you or RSF will need to set up the shipment by a carrier.
Can I use RSF for LTL/TL Orders?
Absolutely! If you have inventory at RSF that you would like to send in an LTL/TL shipment, we can support that. Here’s how that works:
- Create order in the RSF Operations Portal for everything you’d like to include in the shipment.
- For shipping method choose “LTL (Arranged by RSF)” if you’d like RSF to arrange for pickup or “LTL (Arranged by Client)” if you’d like to arrange the pickup yourself.
- Place the order on hold.
- A “Freight (LTL/TL) Order” ticket will automatically be generated in TeamSupport with the order number to notify the RSF Operations team.
- The RSF team will prepare the order and respond to the ticket with the weight and dimensions of the shipment.
- If you selected “LTL (Arranged by RSF)” as the shipping method, the Operations team will use those dimensions to get you quotes and will provide the list of quotes for you to choose from.
- If you selected “LTL (Arranged by Client)” you will use the weights and dimensions provided by the operations team to get your quote and arrange shipment. Please notify RSF in the same TeamSupport ticket to let us know once the shipment has been scheduled.
What information do I need to get an LTL quote?
RSF would be happy to get quotes for you for an LTL shipment (from RSF or from another location). If the shipment will be coming from RSF, you will need to follow the instructions above for submitting an LTL/TL order. If the shipment will be coming from another location, we will need the following information to obtain a quote:
- Size and weight of pallets
- Type of items to ship
- Destination zip code
- Does the delivery location have a dock or will the truck need to have a liftgate?
- Business or residential address?
- Any special requirements like hazardous material or need an appointment time for delivery?
What if I have special instructions associated with an order?
While there are fields for internal notes and notices, we ALWAYS recommend submitting a TeamSupport ticket to notify our team of special requests or special instructions related to specific orders. Because we ship such a high volume of orders on a daily basis, we cannot guarantee we will see notes associated with each order. If you have any additional questions or requests about special instructions for orders, please contact your RSF account manager.
How do I file a claim for a lost or damaged package?
When a package has been damaged in transit or lost by FedEx (or other carrier) and a trace is unsuccessful, we will file a claim on your behalf. To submit a claim for a damage or lost package simply open a ticket in our support portal (TeamSupport) or send an email to support@redstagfulfillment.com. One of Red Stag’s account managers will file the claim on your behalf. To do so, in your ticket you need to include:
- Tracking Number
- Is the package lost, damaged or stolen?
- Item(s) description
- Quantity
- Cost of one unit of each item in the package (a PO or Receipt is also very useful to attach)
- Any images of the package/item if it has been damaged when available (this is normally only needed if the items in the package exceed $100)
Once the claim has been filed, you will be given an update with the case number. Once notified by the carrier that the claim has been approved or denied the ticket will be updated. If it has been approved, the amount will be noted in the ticket and you will receive credit for that on your next fulfillment invoice.
How do I estimate the shipping cost for an order?
Calculating shipping costs can be a little overwhelming at first. However, with the right tools, it’s much easier to quickly understand the estimated shipping cost for a particular order. For purposes of this example, we are going to use FedEx as the carrier. However, many of the same principles can be applied across carriers.
Shipping cost is based primarily on two factors: 1. Distance and 2. Weight. For distance, the further a package must travel, the more it costs. Most carriers segment the United States into Zones. The higher the zone number, the further away the destination and the more expensive. Similarly, the heavier the package is (in actual weight or in dimensional weight) the more expensive the shipping cost will be.
Lastly, while it is fairly simple to determine the base shipping cost of a particular package, there are also surcharges that may be applied to each package based on a variety of factors. For example, the most common is the Residential Delivery fee which will be charged if the package is being delivered to a residential address. There are additional surcharges that should also be considered that you can view here.
- Determine the zone: To determine which zone you are shipping to you can use the FedEx “Find Zones” tool. All you need to know is which zip code you are shipping from and which zip code you are shipping to. If you are shipping from the Knoxville warehouse, the zip code is 37914. If you are shipping from the Salt Lake City warehouse, the code is 84116. If you were shipping from one of our warehouses to another, you can see that it would be a Zone 7. *For International orders, you will want to use the Zone as referenced in the FedEx Service Guide.
- Determine the weight: The next step is understanding the weight of your product. While this seems pretty straightforward, it actually depends on the product you are shipping. Carriers will look at the actual weight as well as the dimensional weight of the product and determine which is more and use that number to set the weight of your package. Dimensional weight is based on the size of your package (how much space it takes up on a carrier’s truck). To determine the dimensional weight of your package you can use the dimensional calculator on our website. If your orders normally require several pieces to go in a single package and your box sizes vary, it will be important to have a good estimate of what box size will be for the order so you can determine the dimensional weight.
- Find your rate: Now that you know the zone and the package weight, you will use the shipping tables provided to you by your account manager to identify the service level (FedEx Ground, Overnight, SmartPost, etc.), the weight, and the zone to determine the base rate.
BILLING FAQs
- Which payment methods are available?
- Direct ACH is our preferred method
- Upon request, we can accept wire transfers or credit card payments (client will be responsible for all additional fees)
- How many invoices will I receive?
- You can expect to receive 5-6 invoices per month. This will include 4-5 weekly shipping invoices and 1 monthly Fulfillment Services and Storage Invoice.
- How much will it cost for picking? Packaging? Overboxing? Applying labels?
- All fees are listed in the FSSA. Detailed fulfillment and shipping cost breakdowns can be prepared on a case-by-case basis upon request and will be charged at the Special Projects Rate listed in your FSSA.
- When will I receive my invoices?
- Fulfillment Services and Storage invoices are issued on the 10th of every month. Weekly shipping invoices are generally issued on Fridays.
- In the case of ACH payments, how long will I have to review my invoices before payment is automatically withdrawn?
- You will have a minimum of 3 days to review your invoices before ACH payments are processed.
- What do I do if I believe I have an incorrect charge on my invoice?
- Please reach out to your account manager to review charges listed on your invoice(s) on a case-by-case basis.
OPERATIONS PORTAL LOGIN INFORMATION
Your system logins have been created.
Go To: Your RSF Dashboard
- Enter your User Name. User Name = email address
- Enter your Password:
- The password is currently the same for all the accounts: company1
- To Change your password, log-in using the credentials provided above, then go to System > My Account.
- User Permissions:
- Each account is set up as “Merchant – Full Access” which gives “Administrator” access to do or change anything.
- To change individual user roles:
- Go to: System > Permissions > Users
- Click on an individual user
- Click on “User Role” on the left
- Select the appropriate role name: Remeber, “Merchant – Full Access” users can make these changes on any user.
ADDING PRODUCTS & CREATING ASNs IN THE OPERATIONS PORTAL
Before you send us your inventory, we need to have your product information entered into the Operations Portal and have an ASN (Advanced Shipping Notice) created to receive your inventory off of once it arrives. Both steps are very simple:
- Add Your Products (view a YouTube tutorial here):
- Log in to the system and go to Catalog > Manage Products.
- Click on the “Add Product” button on the top right.
- Fill in the required fields such as Name, SKU (which must match exactly to the SKU description for your product), Barcode (if you have one), etc.
- Make sure you fille in all required information marked with a “*.”
- NOTE: The default setting for Packaging is that a SKU shipped by itself will NOT require an over box (though we will always use our best judgment if we believe a product needs to be overboxed). In the “Packaging” tab, please change “Requires Packaging” to “YES” if you require the product to be overboxed.
- Click the “Save” button on the top right.
- Create an ASN (View a YouTube Tutorial here):
- Log in to the system and go to Deliveries > ASNs.
- Click on the “Create New ASN” button on the top right.
- Fill in as much “ASN Information” as you can, but at least complete all required information marked with “*” (Supplier, Expected Delivery Date, Carrier Name).
- Click the “Add Products” button on the top right.
- Click the box in the “Select” column next to the product(s) we will be receiving.
- Put the quantity of each product we will be receiving into the field in the “Qty to Add” column.
- Click the “Add Selected Product(s) to ASN” button on the top right.
- Once you’re finished adding products, click the “Submit ASN” button on the top right.
Additional Information Required for International Orders
If you plan to ship orders outside of the United States, you will be required to enter additional information for each of your SKUs. To do this, you will go to:
- Catalog > Manage Products
- Select a SKU/Product
- Click the “Export” button in the left sidebar
- Fill out the required information as well as the additional information if you have it available for reference (*Required):
- Description of Goods for Export*: Simply use a few words or a phrase to describe the product
- HTS Base Code: This code isn’t required, but it does help Customs quickly identify how your product should be categorized and taxed.
- HTS Country Code: This code isn’t required, but it does help Customs quickly identify how your product should be categorized and taxed.
- Customs Value USD*: This is the retail cost of the product. In other words, this is what your customer pays for this product. It is very important that this information is accurate, as each country will use this as the base for which to tax the product.
- Country of Manufacture*: Please select the country where this product was manufactured.
BULK UPLOAD FOR ASNs, ORDERS AND PRODUCTS
Bulk Uploading an ASN
In the event that you have a large number of products to add as a delivery (ASN) in the RSF Operations portal, you have the ability to perform a bulk upload of delivery information with a CSV or Excel file. To do so, follow these directions:
- Select System > Import/Export > Import – Task
- Select New Delivery Import.
- Choose the file type you’d like to upload.
- Choose the file, and select Import.
- Select the “View Documentation” button for more information on file structure. You can also refer to the following for column heading information:
- id: this column is only required if you plan to upload multiple ASNs at one time. If you are only uploading 1, you can leave it blank.
- delivery_type: asn
- sender_name: this is the name of the manufacturer or your company depending upon where the product is being shipped from
- carrier_name: name of the carrier who will be delivering the shipment. If you don’t know, TBD is fine.
- expected_delivery: this is a date field for the approximate date the shipment will be delivered. The format should be: “YYYY-MM-DD”
- merchant_ref: optional field for any internal reference code your company may use. If used, this must be unique per delivery type.
- sender_ref: optional field for any internal reference code the manufacturer or carrier may use
- SKU: The SKU exactly as it is entered in the RSF Operations Portal
- Qty_expected: total quantity expected of a particular SKU on a shipment
- Click here for an example of what the file may look like.
Bulk Uploading Products
In the event that you have a large number of products to add to the RSF Operations portal, you have the ability to perform a bulk upload of product information with a CSV or Excel file. To do so, follow these directions:
- Select System > Import/Export > Import – Task
- Select New Product Import.
- Choose the file type you’d like to upload.
- Choose the file, and select Import.
Refer to the following link for a description of the headings you’ll need to use for each column in the file: http://prntscr.com/gtqyyw.
Select Catalog > Manage Products > Add Product to view the actual fields described in the previous link.
Refer to the “Product Properties” below to understand what content should be in the column. The only column required for upload is SKU.
Bulk Uploading Products
In the event that you have a large number of products to add to the RSF Operations portal, you have the ability to perform a bulk upload of product information with a CSV or Excel file. To do so, follow these directions:
- Select System > Import/Export > Import – Task
- Select New Product Import.
- Choose the file type you’d like to upload.
- Choose the file, and select Import.
- http://prntscr.com/gtqyyw
Refer to the following link for a description of the headings you’ll need to use for each column in the file: http://prntscr.com/gtqyyw.
Select Catalog > Manage Products > Add Product to view the actual fields described in the previous link.
Refer to the “Product Properties” below to understand what content should be in a column. The only column required for upload is SKU.
Product Properties
SKUs
{ “sku” : “product1” }
A unique identifier for a product. The SKU does appear on the packing slip. It is recommended that this be human-readable and end with a per-pack quantity to facilitate proper receiving. For example, a single blue widget may be “BlueWidget-1” and a pack of 5 blue widgets may be “BlueWidget-5”. Maximum character length is 64.
name
{ “name” : “Product 1” }
The “Name” property.
export_description
{ “export_description” : “Herbal teas and herbal infusions (single species, unmixed)” }
Harmonized Tariff Schedule article description.
barcode
{ “barcode” : “product1,p1” }
The “Barcode” property. Single or comma separated barcodes.
goods_type
{ “goods_type” : “NORMAL” }
The “Goods Type” property. Allowed: “NORMAL”, “ORM_D”.
status
{ “status” : 1 }
The “Status” property. Allowed: “0” – out of stock. “1” – in stock.
availability
{ “availability” : 1 }
The “Availability” property. Allowed: “1” – available. “2” – not available.
visibility
{ “visibility” : 2 }
The “Visibility” property. Allowed: “1” – not visible, “2” – visible.
weight
{ “weight” : 12 }
The “Weight” property.
length
{ “length” : 5 }
The “Length” property.
width
{ “width” : 6 }
The “Width” property.
height
{ “height” : 7 }
The “Height” property.
customs_value_usd
{ “customs_value_usd” : “24.5600” }
The “Customs Value USD” property.
country_of_manufacture
{ “country_of_manufacture” : “DK” }
The “Country of Manufacture” property.
hts_base_code
{ “hts_base_code” : 1234.56 }
The “HTS Base Code” property.
hts_country_code
{ “hts_country_code” : “BH:1000|ZW:1001” }
The “HTS Country Code” property. Format: “{COUNTRY}:{CODE}”. Separator: “|”.
requires_packaging
{ “requires_packaging” : 1 }
The “Requires Packaging” property. Allowed: “0” – not required. “1” – required.
confirmation_per_item
{ “confirmation_per_item” : 0 }
The “Confirmation per Item” property. Allowed: “0” – not required. “1” – required.
special_box
{ “special_box” : “specialboxsku” }
The “Special Box” property. SKU of the special box packaging.
special_infill
{ “special_infill” : “specialinfillsku” }
The “Special Box” property. SKU of the special infill packaging.
special_tape
{ “special_tape” : “specialtapesku” }
The “Special Box” property. SKU of the special tape packaging.
special_other
{ “special_other” : “othersku1|othersku2” }
The “Special Other” property. SKU of the other special packaging. Separator: “|”.
unit_qty
{ “unit_qty” : 5 }
The “Unit Quantity” property. Number of individually packaged items contained therein for purposes of special packaging features.
external_id
{ “external_id” : 632910392 }
The “External ID” property. The external unique numeric identifier for the product.
vendor_sku
{ “vendor_sku” : “vendorsku” }
The “Vendor SKU” property. Use if different from the “SKU” property.
Bulk Uploading Orders
In the event that you have a large number of orders to add to the RSF Operations portal, you have the ability to perform a bulk upload of orders with a CSV or Excel file. To do so, follow these directions:
- Select System > Import/Export > Import – Task
- Select New Order Import.
- Choose the file type you’d like to upload.
- Choose the file, and select Import.
You can view all of the required fields for the order import here.
CREATING ORDERS IN THE OPERATIONS PORTAL
You have the ability to add orders to operations portal manually. This may be done if you have a special order, have an issue with your integration, or don’t have integration at all. (View a YouTube tutorial here) :
- Log in to the system and go to Sales > Orders.
- Click on the “Create New Order” button on the top right. a. If your account contains multiple brands, select the button next to the brand under which you wish to generate the order.
- Fill in all the pertinent fields in the “Shipping Address” section.
- Make sure you fill in all required information marked with “*.”
- Select the desired “Shipping Method.”
- Choose any specialized option in the “Shipping Options” section if needed.
- Input any specialized information in the “order history” section if needed.
- Order Number
- This is a unique field in that any information that is put into this field cannot be duplicated with any other order.
- It is recommended to leave this field blank and let our system auto-generate the Order Number when the order is created.
- Any information contained in this field will be visible on the packing slip
- Order Ref Number
- This field can contain duplicate information.
- This field is recommended to be used if you need to reference any type of specific company order information.
- Any information contained in this field will be visible on the packing slip.
- Order Comments
- This field can contain duplicate information
- Any information contained in this field is not visible on the packing slip.
- Order Number
- Click on the “Add Products” button on the top right.
- Click the box in the “Select” column for each product you want to add to the order.
- You can filter the list of products by ID, product name and/or SKU by typing information into the respective fields and click the “Search” button.
- Any filtered search can be reset by clicking the “reset filter” button.
- Designate the quantity of each product you want to add to the order in the field under the “Qty To Add” column.
- Click “Add Selected Product(s) to Order” when you have finished selecting the products for the order.
- Verify all the information is correct then press the “Submit Order” button on the top right.
ADDING RMAs INTO THE OPERATIONS PORTAL
Before sending us a return, we would prefer to have the RMA entered into the Operations Portal so as to properly receive the return once it arrives. View a YouTube tutorial here:
- Log into the system and go to Deliveries > RMAs.
- Click on the “Create New RMA” button on the top right.
- Fill in as much RMA information as you can, but at least complete all required information marked with “*” (Customer Name, Authorization Date, Carrier Name). It is also very beneficial to include the original order # in the “Merchant Order #” field.
- The “Merchant RMA” field is not required as an RMA # will be generated upon completion, however, if you have an internal RMA # you would like to use, please enter it here. You can give your internal RMA # or the generated RMA # to the customer. Either will work.
- If there are any special instructions, please add the min to the “Delivery Comments” section.
- Click the “Add Products” button on the top right.
- Click the box in the “Select” column next to the product(s) we will be receiving.
- Put the quantity of each product we will be receiving into the field in the “QtyTo Add” column.
- Click the “Add Selected Product(s) to RMA” button on the top right.
- Once you are finished adding products, click the “Submit RMA” button on the top right.
- When RSF receives the RMA, we will deliver and process it as normal, however, we will make sure to inspect the products very thoroughly for damage/defects.
INTEGRATING WITH RED STAG FULFILLMENT’S WAREHOUSE MANAGEMENT SYSTEM
In order to meet the ever changing needs of your customers, it’s important that their orders are sent to our system quickly and efficiently. There are a variety of ways to get your orders into our system:
- Direct Integration: The best way (and the way we recommend most) to get orders from your cart into our warehouse system is by coding an integration directly using our documented API. You can access that information here. If you are in need of a username and API Key for this method of integration, please contact your account manager.
- Shopify Plugin: In addition to our open API, we’ve also developed a plugin for integration directly with Shopify. This integration allows you to have all the benefits of the direct API integration by simply providing your account manager with an account that allows them to directly connect your Shopify cart with our Warehouse Management System.
- Middleware Provider: If you do not have access to development resources to code your own integration or you do not have a Shopify cart, we can also work with a middleware provider that will act as a bridge between systems. The benefits of this type of integration is in it’s ease of set up. With this in mind, these type of integrations also normally require that you pay a monthly fee for the integration. In addition, while options 1 and 2 synch orders and inventory in real-time, using a middleware provider will cause a delay in synching (15-30 minutes for orders and up to 2 hours for inventory and pushing tracking information back to close orders). See below for more information on middleware providers.
- Manual Entry: We know that integrating systems may not always be a solution. Because of this, our system is also set up to allow you to manually create orders (one by one or in bulk). You can read more about creating bulk orders (as well as other bulk actions) above.
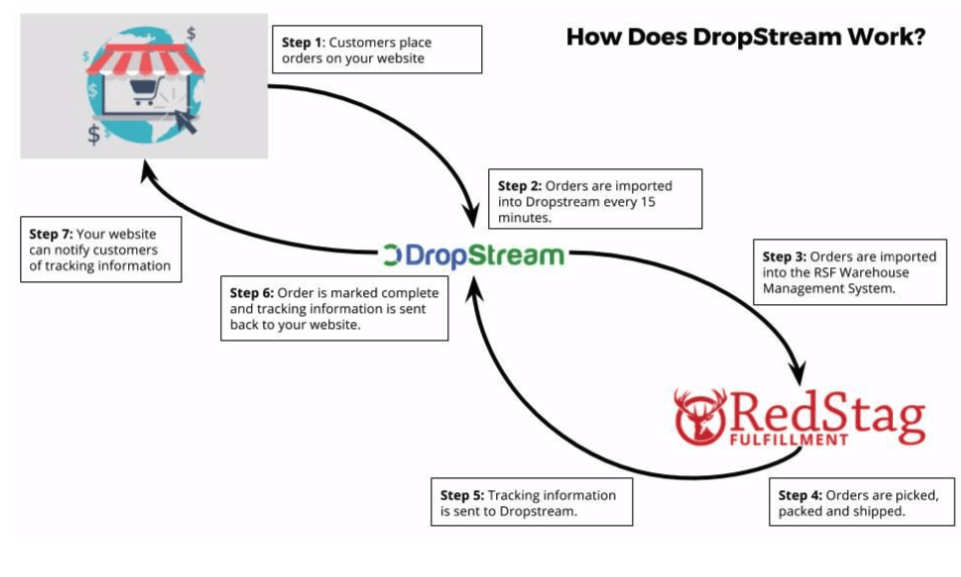
INFORMATION ON DROPSTREAM INTEGRATIONS
One of the middleware providers that Red Stag Fulfillment suggests is DropStream. Using DropStream allows us to easily connect our WMS to your online shopping cart if you choose not to do a direct integration. With this in mind, the middleware provider you choose is totally up to you and what is best for your business. We continue to learn more and more about each individual integration and have included some key things to note:
WooCommerce
For WooCommerce integrations a shipment tracking extension is required to enable DropStream to populate tracking numbers for WooCommerce orders. In other words, if you want your customers to receive notifications with shipping information so they can track their package, you must add this extension. Directions on how to add this extension can be found here.
ShipStation
Currently, one limitation of the ShipStation API is that it does not allow communication from DropStream to allow for inventory updates to be pushed.
Skubana
We are currently working with Skubana to determine the root cause of an issue that is causing inventory discrepancies between RSF inventory and theirs.
KITS/BUNDLES IN THE RSF OPERATIONS PORTAL
The RSF Operations Portal now supports “Bundled SKUs”. Using our Bill of Materials feature we can now allow clients to place orders for a parent SKU that we can link to component SKUs. For example, if you sell a single product that consists of 3 different items, we can now take in a single SKU and use this feature to tell our system which 3 SKUs should be picked and shipped. For more information about bundle SKUs and our Bill of Materials Feature, please contact your account manager.
To submit a Kitting Order refer to the instructions for “How Do I Submit a Kitting Order” in the Frequently Asked Questions above.